
email support: jonas@audjoo.com
website: www.audjoo.com
6/15/2017
Helix was made with a few things in mind.
One of the goals was to provide the highest possible sound quality. Used “normally” Helix should not produce any unwanted sounds.
Many synths provide a lot of features and sound great at the expense of high CPU usage. In a real arrangement, you have a lot of plug ins going at the same time, the goal is for Helix to be a synth you can add without worrying about the CPU-hit too much.
As much as possible of the inner workings of Helix is exposed. Don't be scared by the number of knobs and sliders.
During development in 2007, Helix was originally published as a public beta. Over 30 beta versions were released. During that time excellent feedback, bug reports and feature requests were generated from users. All of which made Helix a better synth.
For all platforms, the following system spec. is recommended:
Cubase, Ableton Live, Logic, REAPER, FL Studio, Renoise, Sonar, Tracktion, Samplitude, EnergyXT, Podium, Bidule, Usine, Orion, Cantabile, Project5, VSTHost, Minihost, ACID
Cubase, Ableton Live, Metro, Logic 8, Garageband
/Library/Audio/Plug-Ins/VST/audjoo_helix_data
To find this on a mac, use the finder, the menu-item called "go" and pick "my computer", that should show you the "Library" folder, and you should be able to click your way from there.
This guide will go through each element of Helix one at a time. But first let's cover some global topics.
If you have not purchased a license (yet) Helix will run in trial mode, you will see it in the lower right corner of the window. The limitations of the Trial mode is:

EXPLAIN VOICE-STAGES and GLOBAL-EFFECT-STAGES HERE!
Every voice in Helix consists of oscillators creating sounds, filters that cut or boost frequencies, Distortion Shapers that add new harmonics and a final amplification step that shapes the amplitude of the sound over time. All the active voices are then added together and global effects are applied to them.
Helix uses a file system approach to loading user waveforms and presets. In the folder where you've installed Helix (eg: C:\Program Files\Vstplugins\Helix) there is a sub folder titled "cycles" and "patches" respectively. Each preset is organized in a “bank” (typically named based on author) and a “category” (leads, bass and so on). Basically a two level folder structure. To create a new bank, simply create a new folder for your bank and folders for each category.
Custom waveforms (singe cycle) are also possible. In the folder “waves” you can place loopable 8/16/24/32-bit MONO WAV files, no larger than 4096 samples.
The oscillators have little to no aliasing in output. Band-limitation principles are employed in Helix's synthesis architecture, while still striving to keep CPU usage at a minimum with maximum sound quality. An oscillator (OSC) can be on or off, if it's off it consumes no resources and doesn't show any settings on the screen. Common controls are below

Indicates where in the signal chain is the OSC going to be routed, where it corresponds to the 6 stages of the Filter Stages section
Change the OSC type you wish to use. There are currently 4 to select: Wave, Noise, Analog, String.
Controls the individual OSC's initial loudness. Volume control is bipolar, therefore an amplitude below zero will result in an inverted output. (Note that you will not see the inversion on the OSC Preview.)
If you want the volume of the oscillator to decrease with higher notes, lower the "Amp Key Trk"
Adjusts the note range of the OSC. Lo Key (left) determines the lowest, whereas Hi Key determines the highest note allowed. You can assign individual note ranges with all 4 OSCs, therefore allowing the possibility to use more than one type of sound in a single preset.
Adjusts the starting point of the oscillator. Logically, the start of a sound would have a click if it were to start beyond the center. You can use this to move the starting point closest to the zero line.
A controller for OSC Phase, from which it sets a random starting phase on each note trigger. On Wave shaper mode, you will see a blue overlay being drawn on the OSC Preview, parallel to the Red Super Overlay, which is discussed further on.
Controls the panorama, or stereo balance of the OSC.
Controls the stability of an OSC's pitch. Like an analog synthesizer, the pitch sometimes changes randomly. You can use this control to simulate that effect. Note: Faster speed almost resembles pitched noise.
Adjust the central octave of the OSC
Transposes the OSC to a different key, in semitones.
Adjust how “off” the OSC sounds to the correct pitch, in cents.
Pitch Key tracking amount, tuned in Equal Temperament
Helix's primary OSC type is the "Wave" mode. As shown above, you're given plenty of controls, as well as a nice little graph that shows you what your sound looks like.
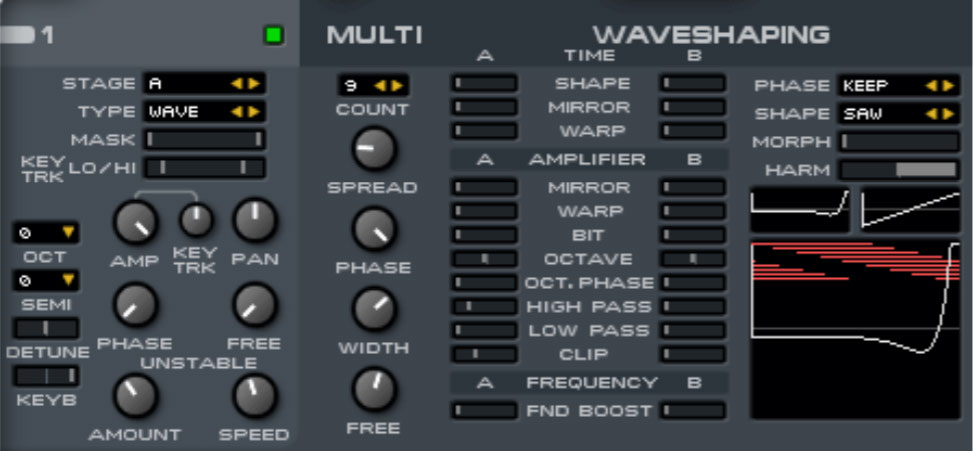
The multi section allows you to modify the current waveform by layering itself with copies of the same waveform for a single note, in order to get that "super" sound. It's very similar to a Unison Mode found in some synthesizers, only this time you can have up to 4 of them in total! (In addition, you can play these sounds in full polyphony!)
Select the number of voices (or copies) of the oscillator. A dim, red bar is shown on the OSC preview, where more voices will mean a vertically-larger bar.
This controls the pitch separation (in semitones) from each voice. The larger the value, the more spread out the pitch of each voice, and the more "fatter" the sound.
Adjusts the width of the Multi OSC. You can decide whether or not you want each super voice heard in stereo, or if you want to condense the sound through a single speaker.
Like the OSC Phase controller, this controls the starting phase of each super voice. Basically, lower values will restrict each voice's phase to the same point of the waveform, which will most likely give a "phaser" effect. On the OSC Preview, the red bar will flex horizontally where the bar overlaps the starting points of each super voice.
This controls the ability to trigger a super voice without starting on the same phase of any of the other voices. The higher the value, the less likely there will be any "phaser" effect. This is shown on the OSC Preview as a red horizontal wipe across the waveform.
The Shape Morph control is a variable that allows you to change between the two wave shaping configurations made for the OSC. There are three morphing modes, all which alter the phase treatment of the shaped waveforms.
KEEP - All phases are kept.
COPY- Copies the phases from first waveform and applies them to the rest.
RESET - Resets all phases to zero.
The two latter modes makes for smoother morphing, so if you have modulation of the morph, try these.
You can also control the available harmonics of the OSC waveform. This is simply a "brick wall" low-pass filter that fully cuts out the upper harmonics of the waveform, only to leave lower harmonic tones present. Keep in mind that this will cause the upper notes to be inaudible, which you may consider attaching a KBD1 (Key track) onto it.
One of the more powerful features of Helix's synthesis engine is the wave shaper. This section gives you several ways to transform your basic OSC waveform, into a completely different sound. With every different base waveform results in different results of sound. The great thing about this is, you're given the ability to use two for a single OSC! Not to mention the Shape Morph option will give you even more changes in sound while you breed from one wave shape to another. The variable controls are as follows:
These change the characteristics of the waveform based on time. (ie: Horizontal) Pitch does not change, but will change the formant tone, if not add a subharmonic per-cycle.
This squashes the original waveform, while stretching out the tail of the single cycle.
This adds a reversed copy of the original waveform, and another.
Wraps extra copies of the original waveform. This is akin to "Hard-Sync" oscillator morphing, only the secondary pitch harmonic is the determined value of the wrapped shape
These change the characteristics of the waveform based on height. (ie: Vertical) All changes made to the function based on amplitude will remain at the same loudness/volume.
Virtually, this cuts through the vertical position of the waveform and flips the exceeding part of the function inward
Wraps the waveform vertically, where the extreme peaks are shifted to the bottom of the graph, similar in behavior to the Amp Mirror. This can be used as an alternative for adjusting Pulse Width (PW) of any waveform, only the bit after the asymptote aren't purely flat.
This decreases the amplitude resolution (ie: the amount of possible changes from the center) of the function by quantizing the waveform. This works exactly like a simple bit-crusher
Layer an identical-but-higher-octave waveform
Changes the relative phase of the layered octave OSC
High Pass Filter which attempts to remove lower harmonics of the waveform, then amplifies the remaining high frequencies.
Low Pass Filter which attempts to remove higher harmonics of the resultant waveform from above, then amplifies the low frequencies.
Flattens the peaks of the function while retaining total amplitude.
This boosts the fundamental of the waveform, while attenuating the other partials. At full setting only the fundamental will be heard, effectively turning the wave into a pure sine wave.
Similar to old sound chips (like those in early home computers), Helix Noise uses a "Sample and Hold" style. The only parameter specific to it is whether it should generate mono or stereo noise. At first glance, it would appear to sound nothing but a simple White Noise generator. Try adjusting the OSC to -11 octaves below to hear the distinct pitch noise. Consequently, OSC Unstable can alter its pitch stability
The analog oscillator generates a full-band Square wave where the pulse width can be adjusted. Its PW Morph parameter corresponds to the OSC Morph setting in the matrix. Unlike the wave shaper's Square Wave, this can be useful to create very low bass sounds that can cut through frequencies without any attenuation while morphing
The string model is a mathematical model of two vibrating strings.
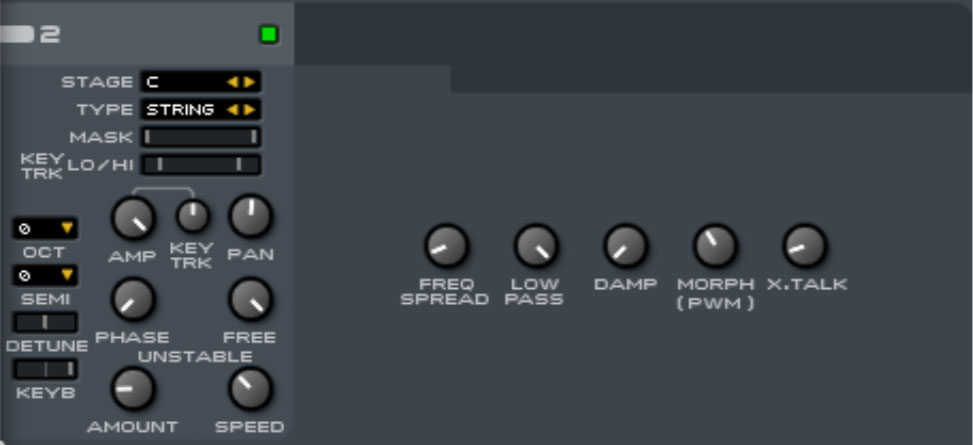
Adjusts the detuning between the two strings.
When a wave bounce at the end of a string it looses some high frequency. Beware of that this can introduce some phase smearing on higher notes.
When a wave bounce at the end of a string some of the energy is lost.
Changes the position of the pickup/microphone along the string body. Modulating this sounds similar to pulse width modulation.
When a wave bounce at the end of a string some of the energy is transferred to the other string.
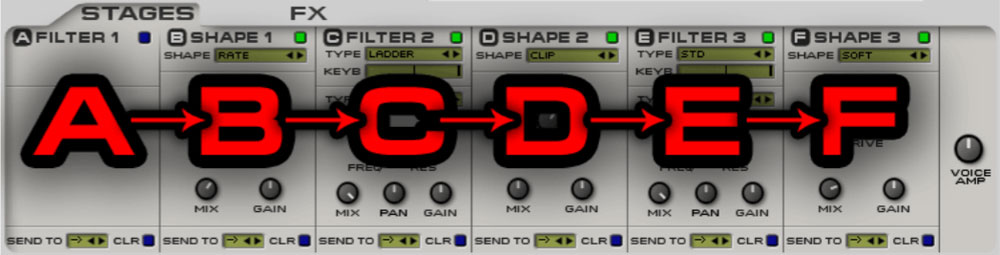
Helix has a semi modular Signal Flow The common signal flow mode is when all filters and shapers are connected in series.
The less common mode is called parallel, where “ab” and “cd” are processed in parallel, then mixed together before being processed by “ef”.
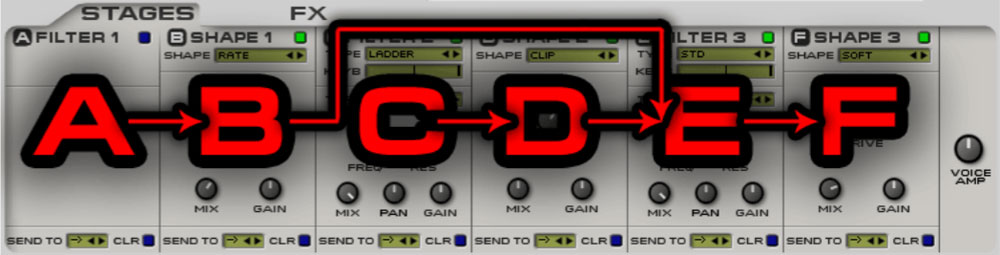
Finally there is "par2" where “ab”, “cd” and "ef" are processed in parallel, then mixed together.
You can use three filters at the same time. Each one can be of any of the below types. The central theme for the filters are that they add or remove frequencies, as opposed to the shapers they seldom add harmonics that are not there, or otherwise drastically change the original input sound.
Enable or Disable the filter stage.
Lists all the different types of filters
Corresponds to Filter Frequency. Defines an incremental change across the keyboard.
Wet/Dry function.
Output amplification.
This is an advanced function which allows you to route a filter stage's output directly to the Global FX chain.
This is a standard SVF filter. You have control over eliminating certain frequencies on the sound spectrum, as well as amplifying the cutoff frequency slope.
Choose between Low Pass, Band Pass and High Pass filter types.
This feature allows the ability to amplify or attenuate frequencies on the sound spectrum. Unlike the filter, this simply "adds" onto the existing signal. Tip: Try using the Peak type with the Boost set to minimum, to gain a "Notch Filter" effect. Likewise, Low and High shelf can act as an alternative Low/High Pass Filter at negative boost
Choose between LOW SHELF, PEAK, and HIGH SHELF. Freq Central Frequency.
Level of influence (corresponds to MIX)
Slope/Bandwidth
The ladder filter is modeled after the famous Moog filter. It is an adjustable Low Pass filter that allows the ability to shape the slope.
Define the filter slope by selecting the amount of poles. (Up to 4)
is the center frequency of the filter.
is the amount of feedback in the filter, this will create an emphasis around the center frequency. If turned to the max the filter will bloom out in self oscillation. Note that the feedback path is non-linear so the sound of the filter depend on the amplitude of the signal it receives.
This special mode, unlike the rest of the filter modes, can actually generate a clean sinusoidal waveform on its own. The difference is, any sound you put through it, this will simply act as a "carrier oscillator" which will alter the overall sound significantly. Input amplitude defines modulation magnitude. It is advisory you use the Key tracking option.
Choose between AM (Amplitude Modulation), RM (Ring Modulation), or PM (Phase Modulation).
Central frequency of the OSC carrier, measured in semitones.
This filter feeds in input, and delays the time before it sends output. The difference between this and the FX DELAY is that you can work with the delayed sound as a means of modulation, and functions much like a simple chorus/flanger, or comb filter.
Choose between DLY and DLYFB; the latter being the same as DLY, but with feedback. Frequency Adjusts the time separation between the original sound and the delayed output. The higher the value, the smaller the time difference. Despite the bipolar nature of the knob, the delay doesn't go beyond 1sec in maximum delay.
This controls the amount of delay feedback. (Only applicable to DLYFB)
The PMDelay (Phase Mod Delay) is actually a Sinus Pitch LFO, where the input signal is modulated by a sinusoidal frequency of variable magnitude. Using the key track function, you can use it as a Frequency Modulation (FM) carrier oscillator.
Pitch/Rate of modulation, scaled in semitones.
Peak-to-peak amplitude of the carrier oscillator. Tip: To increase beyond the magnitude, add an identical copy on the filter flow.
Derived from the String Model OSC, the emulation of the string body characteristics are offered as a filter, thereby adding a potential acoustic character to your sounds.
Adjust the central frequency of the string body. This will alter the character of the output tone of the sound, in addition to amplifying a certain harmonic in pitch. (For instance, whatever setting you use, a certain note will sound the loudest.) Tip: To avoid the uneven amplification problem, adjust the key tracking.
Adjust string tension, which affects how much upper tones are in the sound.
Adjust the decay of the vibrating string body.
Detuning between the two strings in the model.
Sound travel between two strings.
Position of pickup/microphone along the string body.
Based on the global FX limiter, you are able to limit the amplitude of the sound without clipping distortion.
Choose between peak limiters with or without stereo separation.
Response time for the limiter to react to input exceeding amplitude.
Amplification of input signal relative to the limiter's total headroom. (tip/warning: if you drive this too hard, you'll get loud clicks as the voice starts)
Most of the shaper modes are just a plain non-linearity, this is effective to add harmonics similarly to over-driven analog amplifiers, transistors, tubes, or analog diode clipping circuits. Some of the modes are based on totally different ideas. The Bit Crusher and Rate Reducer can emulate the sound of early sample-playing hardware (speak and spell, Casio SK1, early video game system, computer and samplers). Go ahead, try out and experiment with the different distortion types! Shape Choose between the different distortion shaper types: Soft, Hard, HF0, Tanh, HF2, Sine, Rectifier, Bit, Clip, Rate. Drive Adjusts the amount of shaping to the input signal. Mix Wet/Dry Function. (Unipolar) Gain Output amplification.
On the FX Order, you can use your mouse to select an effect along the chain and drag it across to change its stage placement.
If you have any filter/shaper stages mapped to SEND FX, the letters will correspond to which effect the signal is sent to.
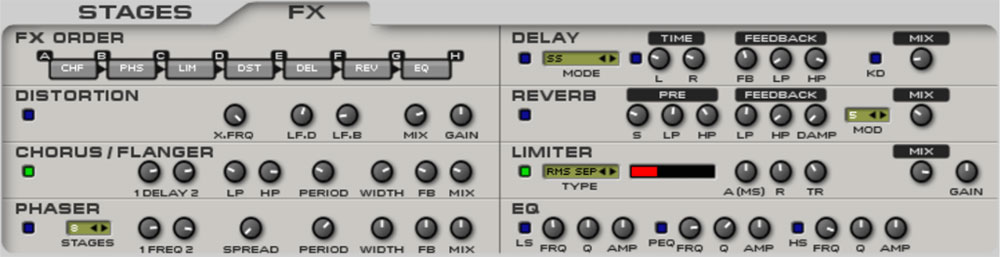
The distortion effect splits up the signal in two frequency bands and distorts to lower. Then the two signals are mixed together again
Determines the divide between the low and high band.
This adds overdrive to the Low frequency band
Determines the level of the distorted LF band based on the above setting
Wet/Dry function
Output amplification
This effect is a two delay lines with an LFO that modulates the delay time.
These controls determines the extremes of the delaytime.
A low pass filter that affect the sound of the chorus.
A high pass filter that affect the sound of the chorus
How fast the internal LFO completes a cycle from the low delay time to the high and back.
How many degrees off phase the left and right LFO should be.
Each delay line feedback to the input again, both negative and positive values are accepted.
A mix of the dry and the wet signal, at 0 only the dry comes through, and at 1 only the delayed sound comes through.
This is an analog style phaser. Made up by several all-pass filters and an internal LFO modulating them.
How many all pass filters should contribute to the phase shifting
The low and high center frequencies of the all pass filters.
How the filters should be spaced, 0 is the normal, but higher number will change the distance between valleys and peaks.
The time for the internal LFO to complete a cycle from the low frequency, to the high and back.
How many degrees off phase the left and right LFO should be.
Both arrays of all-pass filters (left and right) feedback to the input again, both negative and positive values are accepted.
A mix of the dry and the wet signal, at 0 only the dry comes through, and at 1 only the phase shifted sound comes through.
This effect adds a stereo echo to the sound. You can modify the delay time between each tap along the stereo signal. In addition to that, there is a Ducking Key mode which the loudness of the delay taps can be attenuated or amplified depending if there is a note being held down or not Mode
Choose between: - LX, (mono mix) left first cross - RX, (mono mix) right first cross - SX, stereo cross - S, stereo - SS, stereo swap.
Enable/Disable Tempo-sync
Time/Synced Left Delay on left speaker Time/Synced Right Delay on right speaker
Adjusts the amplitude of repeated taps from the initial delay
Applies Low Pass filtering to the feedback
Applies High Pass filtering to the feedback
Change between standard and ducking delay mode
Delay amplification when a note is held
Delay amplification when a note is released
Delay amplification. (1.000 = Equal amplitude)
This effect adds reflection to the sound. You can make your sounds sound like it's in a cathedral or a metal tin box, whichever you decide.
Sets the time before reverb output.
LP filter of the pre delay.
HP filter of the pre delay
Low pass filter of the feedback.
High pass filter of the feedback.
Adjusts the length of the reverb tail.
Adjusts the amount of modulation to the reverb signal. Higher means a more diffused sound. Lower is more metallic.
Reverb amplification.
This is a compressor unit which attenuates the sound to a certain level without clipping distortion.
Choose between Peak or RMS. Both modes have stereo separation.
Time to attenuate amplification.
Time to return to original amplification if there is no attenuation.
Signal preamp.
Wet/Dry Function. This is also called parallel compression.
Output amplification
Similar to the EQ filters, except this is applied to final output.
Three bands are available for adjustments:
Low Shelf - Bass frequencies. Peaking Mid frequencies. High Shelf - Treble frequencies.
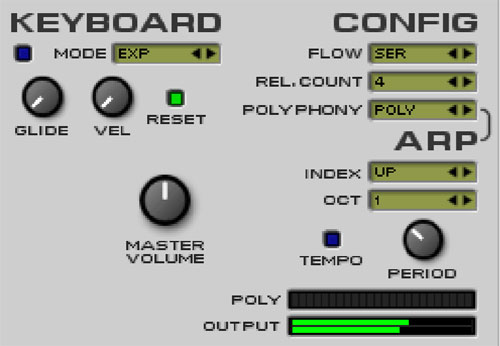
This section controls the overall behavior of the output sound. The Glide Mode can be any of the following three:
● Exponential starts out fast and slows down as it's getting closer to its target. ● Constant Time will glide faster if the distance is greater. ● Constant Speed will reach its target faster if the distance is short. The Glide parameter controls the speed of the glide.
If the Reset is enabled the last note played is reset as soon as no key is pressed. Meaning no glide will happen on the first note of a phrase.
Using Velocity Sensitivity the glide time will be longer for lightly played notes.
is the volume after global effects are applied. It's not stored per patch. Change this if you're using a host with no fader, or if you want to flip through presets
is the volume of a voice before it's mixed together with the other voices and global effects are applied.
is one or the following:
this is how many released notes that are allowed to "live on" when a new voice is started. Keeping this reasonably low is a great way to enable long release times without using a lot of CPU on old voices you might not care about anymore.
This controls how a chord will be played as individual notes in an assigned pattern. Index lists the available arpeggio or phrase types.
Tempo switches between manual time scale, or tempo-sync modes.
Period/Rate sets the speed of the arpeggio. (For tempo sync, smaller values are faster.) Oct determines how many upper octaves the note pattern should repeat.
Helix provides many sources of modulation.
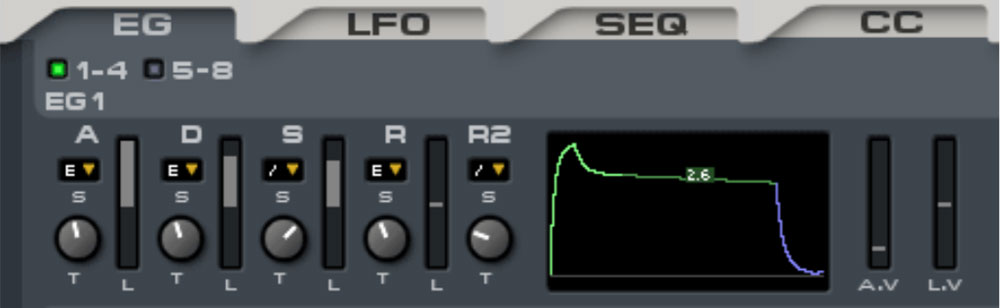
An important detail to know about the envelopes is that EG1 is hard-wired to the amplitude of a voice. As the signal of a voice is sent to the fx bus, the signal is multiplied with the value of EG1. This is to ensure that all voices stops.
Helix offers a total of 8 Envelope Generators! Sounds a bit extreme, but with the amount of modulation possibilities with Helix, you can never have enough. The envelope generator is graphically rendered, which should give a clear indication of its behavior based on the settings. Unlike your basic ADSR EG's, where maximum amplitude is implicit after “attack” time, here you're given the ability to set the amplitude for each of the A, D, S and R stages.
Because of the bipolar nature of envelope level adjustment, this allows the possibility to define negative values on the envelope. Shape Choose between Linear, Smooth, Exponential, and Late curves. Time Adjust the initial time for an envelope to go from zero to a level. Level
Target magnitude.
Attack Velocity Sensitivity Adjusts the amount of change to the Attack Time relative to the MIDI velocity. (ie: Setting this at a high setting will cause lower velocities to trigger a longer attack time, consequently higher velocities will trigger a shorter attack time if not instantaneous.)
Level Velocity Sensitivity Adjusts the amount of change to the overall envelope levels relative to the MIDI velocity. (ie: High setting allows for a shorter level range at lower velocities, conversely a low setting retains the levels at all velocities.)
The Low Frequency Oscillator generators are simply predefined waveforms which function as looping envelopes. You're given 4 Polyphonic LFO stages, and two Global (monophonic) LFO's.
Choose the waveform type of the LFO. (most are bipolar.)
Sets the starting phase of the LFO.
Enable/Disable Tempo-sync
Adjust the time of the LFO before it repeats.
Null delay before the LFO starts.
Time for LFO to go from 0 to Rate speed.
Time for LFO to from Rate speed to Release Target speed.
End level of the LFO. With the exception of some of the "step" forms, all LFO types' ranges reach from -100% to 100% overall magnitude. Eg: Setting O1-PITCH to 1.000 mapped to LFO1 will cause OSC1's pitch to modulate between -1 to +1 semitones relative to the central pitch. Please remember that LFO1-4 are polyphonic , which means on each note strike, the LFO is independent of any previous output and will always restart from starting phase per-note. Use LFOG1/ G2 (Global) if you require a free-running
Perhaps the most advanced mechanism of Helix. The sequencer is simply a usereditable 16-stage LFO. Like the EG and LFO, the sliders are bipolar.
Enable/Disable Tempo-sync
Sets the speed of playing through the sequence.
Interpolates between stages. (think portamento between steps)
Starting bar marker.
Last bar marker.
Bipolar sliders.
Rather than have MIDI Learn hidden on every knob, Helix lets you define which controller you will use. This system is preferable as this section shows you exactly what controller you've had Helix learn, in addition to its usage in the Modulation Matrix, you can easily track down where you've set the controller to modify in Helix. (It's all labeled in fine-print, unlike in other virtual synths where you have to right-click controllers to reveal if it's being controlled by a MIDI CC.) Note: This doesn't stop you from automating options via your host, though you'd probably scream at the amount of parameters listed. At this stage, you are given 4 Continuous Controller maps
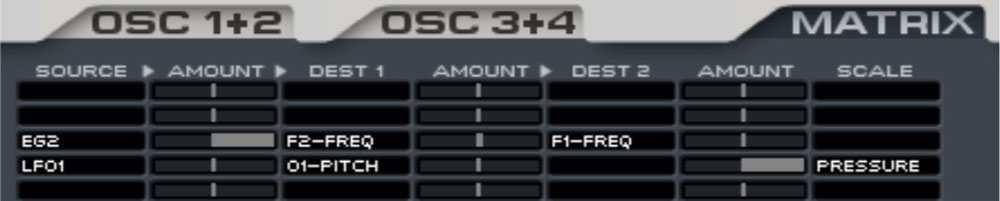
With Helix's synthesis capabilities, it doesn't stop there. There's a massive amount of control to be spoiled with the hand of the sound designer. You're given more than enough sources of modulation, as well as the ability to make use of controls that aren't normally usable without attributing what it can modulate. For example:
LFO1 (source) modulates OSC1-PITCH (destination1) and OSC2-PITCH (destination2), using MODW as a means of control (scale) EG2 (source) modulates OSC3-MORPH (destination1) and F1-FREQ (destination2)
Note that some modulation sources may function per-voice (ie: modulation occurs from every NoteOn), or globally (ie: changes as long there is output.) There's no need to fear what you can use to modulate, as both the modulation parameters and the audio output is bufferbased, so your ears are safe from any unwanted feedback.
The ease of use of this matrix table allows for clear indication of what's being modulated per-line. You have more than enough rows, and up to 2 destinations per source possible to modulate throughout Helix.
Choose your modulation source here to modulate up to two destinations at once.
Adjust the amount of modulation allowed to control DEST 1.
Choose your modulation destination here Amount (dest 2) Adjust the amount of modulation allowed to control DEST 2.
Choose another modulation destination here
How much will the scaling source affect the destinations.
Using a modulation source, it can control the amount of overall modulation for the corresponding source. (ie: MODW) Note that usage is interchangeable between Modulation Source, however it will only work if there is a source.
The following abbreviations are used to describe the modulation sources.
Uses the envelope to modulate the destination controller.
Modulates the destination by using a lowfrequency oscillation of their corresponding waveform and configuration. These function per-voice.
Modulates the destination by using userinputted values on the Sequencer module. This functions per-voice
Acts as a Primary Pitch Key tracking variable. This will enable the destination to change value depending on the pitch of the note.
MIDI Velocity from NoteOn will define the modulated output value to the destination. This works per-voice, and is similar to the EG's Velocity sliders.
Corresponds to MIDI Modulation Wheel. Range is unipolar
Acts as a Secondary Pitch Key tracking variable. You can use the Amp Key track Mask options on their corresponding OSCs to define the range of influence along the keyboard
Corresponds to MIDI Channel After touch/ Pressure. Range is unipolar.
As above, but the modulation is global. (ie: monophonic modulation)
Corresponds to MIDI Pitch Bend to alter values. Range is bipolar
Corresponds to the MIDI CC window configuration, where you can have Helix learn your MIDI controls. Range is unipolar
The below abbreviations are used for the modulation destinations.
Corresponding OSC's Amp level.
Corresponding OSC's Pan level.
Corresponding OSC's Harmonics level.
Corresponding OSC's Morph level.
Corresponding OSC's Pitch level. Values are scaled in semitones.
Corresponding OSC's Super Spread level.
Corresponding OSC's Super Width level.
Corresponding Filter's Frequency level. This is common to the first knob of all filters regardless of their name.
Corresponding Filter's Resonance level. This is common to the second knob of all filters regardless of their name, unless noted otherwise
Corresponding Filter's Mix level.
Corresponding Filter's Gain level
Corresponding Filter's Pan level
Corresponding Distortion Shaper's Drive level
LFO's Period value.
Global Phaser period setting.
Helix has been put together by an international team of superstars.
Jonas Norberg
Jörgen Arvidsson @ northernBeat
Nico Herz @ BigTone Studios James Alan Nguyen (dj.tuBIG/MaliceX) Adam Alonso Reason Lahalla Jonas Norberg Nicolas Horn (pandashake) Morgan Kinnear (rinxai)
James Alan Nguyen, and Jonas Norberg
Helix would have not reached the level of quality if it was not for the tireless testing and feedback of all the cool cats at the KVRAudio community.
Helix would not sound as clean without: http://kissfft.sourceforge.net/ (library used for FFT)
In the installation is a file called
“audjoo_helix_EULA.txt”
that covers the end user license agreement.
Audjoo Helix Software Synthesizer © 2008 - 2016
Jonas Norberg